How to Turn a Spare Room Into the Perfect Weekend Watch Zone
Most spare rooms are in a holding pattern. Half storage, half guest room, occasionally used and rarely enjoyed. But a spare room is also one of the most useful spaces in a home when it’s given a clear purpose, and turning it into a dedicated weekend watch zone is one of the better things you can do with it.
You don’t need to gut it or spend a fortune. You need a decent display, some attention to sound, the right seat, and enough thought about the light to make it actually work. That’s the whole brief.
Getting the Room Ready Before Anything Goes In
The biggest mistake people make with a spare room conversion is buying the equipment first and figuring out the room second. The room itself shapes everything: how big the screen can be, where the speakers should go, how much light you’re working against. Sorting those things out first saves a lot of adjustment later.
Light Control Comes Before Screen Size
Natural light and screens don’t get along. A window facing the display, or even a window on a side wall, can wash out the image enough to make daytime viewing frustrating. Blackout curtains or roller blinds are the first purchase, not an afterthought. They’re inexpensive, easy to install, and make a bigger difference to the viewing experience than most hardware upgrades.
Once the room can go properly dark, the display choice opens up. A projector becomes viable where it wasn’t before. A smaller screen looks better because contrast isn’t being fought against ambient light the whole time.
How the Room Sounds Before You Add Anything
Spare rooms tend to be harder-sounding than people expect because they’re often less furnished than the rest of the house. Hard floors, bare walls, and minimal soft furnishings create reflections that smear dialogue and make bass frequencies sound loose and uncontrolled.
A thick rug across the main floor area and some soft furnishings, whether that’s a bookshelf along one wall, curtains with some weight to them, or a fabric sofa or chairs, go a long way toward sorting this out before a single speaker gets placed. Getting the room’s acoustic character into reasonable shape first means the audio system you put in will perform closer to its potential from day one.
Display and Sound: Choosing What Works for the Space
A spare room is usually somewhere between 10 and 14 feet deep, which puts it in a useful middle range for display options. Big enough for a decent projector throw, compact enough that a large-format TV doesn’t feel undersized.
Picking the Right Display for the Room
The choice between a projector and a flat-screen TV comes down to three things: how dark the room can get, how much wall space is available, and what kind of viewing experience you’re after.
| Display Type | Best Room Condition | Typical Screen Size | Setup Complexity |
| 4K flat-screen TV | Any light level | 65″–85″ | Low |
| Standard projector | Dark room preferred | 100″–120″ | Medium |
| Short-throw projector | Low light acceptable | 80″–110″ | Low–Medium |
| UST (ultra short-throw) | Low light acceptable | 100″–120″ | Low |
For a room that doubles as a guest room or office part of the time, a large flat-screen TV is the more practical option: no alignment to manage, no bulb to replace, and it looks fine when the room is being used for something else. For a room that’s fully committed to viewing, a projector and a fixed-frame screen deliver a more cinematic feel at a lower cost per inch of screen.
Sound Without Overcomplicating It
A full surround system is great if the room is dedicated and the budget supports it. For most spare room conversions, a solid two-stage setup covers the bases well: a quality soundbar with a separate subwoofer handles dialogue clarity and bass, and a pair of rear speakers on stands adds enough spatial audio to make the room feel immersive without requiring in-wall installation.
A few things worth getting right regardless of the system:
- Place the subwoofer in a front corner of the room to get the most natural bass response from the space
- Keep the center channel or soundbar at screen height, not above or below it, so dialogue feels like it’s coming from the right place
- Run a quick calibration using the system’s built-in setup tool after everything is placed, since room size and furniture affect frequency response more than most people expect
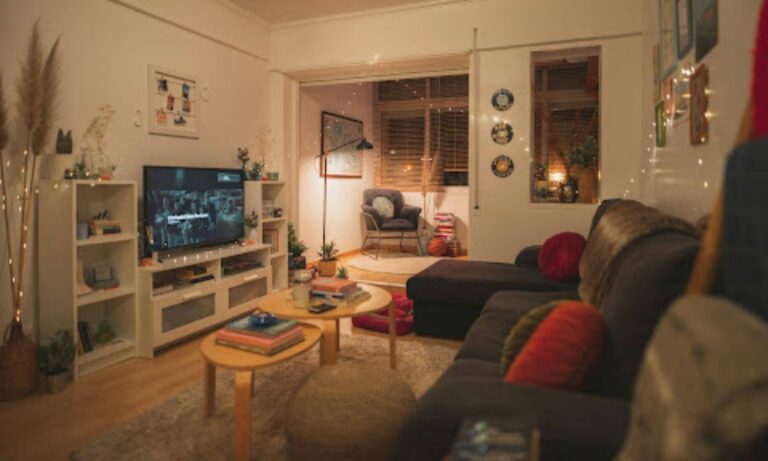
Seating, Layout, and the Details That Make It Somewhere You Want to Stay
Good equipment in an uncomfortable room still produces a bad experience. Seating and layout are where the room either comes together or quietly lets everyone down.
Getting the Seating Right
The viewing distance from seat to screen is one of the most important specs in the room, and one of the most commonly ignored. As a general guide, the ideal seating distance is about 1.5 times the screen’s diagonal measurement: so a 75-inch TV works best with seats around 9 feet back, and a 100-inch projection screen puts the sweet spot at roughly 12 feet.
For a spare room used primarily on weekends, a pair of quality recliners or a purpose-built loveseat gives a noticeably better experience than a repurposed sofa. Movie theater seating designed for home use is built around the demands of long viewing sessions: deeper cushioning, proper lumbar support, and enough width per seat to stay comfortable for two hours without shifting. A standard sofa that works fine for an hour of television starts to show its limitations during a full film.
If the room is large enough for two rows, the back row needs to be elevated by at least 10 to 12 inches to keep sightlines clear. A low platform built from timber framing and plywood is a straightforward weekend project and makes a genuine difference to how usable the back row is.
Layout and the Small Things That Add Up
Once the screen position and seating distance are fixed, the rest of the layout tends to fall into place. A few practical points that often get missed:
- Leave at least 18 inches between the front of the seats and anything in front of them, whether that’s a coffee table, a TV unit, or the wall, to avoid the room feeling cramped
- Position side tables or armrest trays within easy reach so drinks don’t end up on the floor or requiring someone to get up mid-film
- Keep cables managed and off the floor, both for safety in a dark room and because loose cables read as unfinished in a space that should feel settled
Lighting in the room also deserves a minute of thought. A bias light behind the screen, whether that’s a simple LED strip set to warm white, reduces eye strain over longer sessions and makes the image look better without any change to the display itself. Dimmable overhead lighting or a couple of lamps on smart bulbs give enough control to shift the room’s mood from bright and functional to settled and ready to watch.
The Order to Do Things In (and What to Skip)
A spare room watch zone doesn’t need to be finished all at once. The practical order is: sort the light control first, then the acoustic basics, then the display, then seating, then sound, then the finishing touches like lighting control and cable management.
What’s worth skipping, at least initially, is anything that requires permanent structural work before you’ve lived with the room in its basic configuration. Speaker cabling in walls, built-in risers, and custom millwork are all worthwhile eventually, but doing them before you know exactly how you want the room to function adds cost and complexity that’s hard to reverse. Get the room working first. Refine from there.
A spare room that’s been thought through this way stops feeling like a room waiting for a purpose and starts feeling like one of the better places in the house to spend a Saturday evening.